installation.hero.title
installation.hero.description
Not Sure Which Seal Type You Have?
Use this quick guide to identify your seal before watching the installation video.
Type 1 — Most Common
Push-In Seal
Lift the corner of the seal — if you can see a dart or lip sitting inside a plastic channel, it's a push-in. No screws visible.
Type 2 — Older Fridges
Screw-In Seal
Lift the seal flap and look for screws around the door panel. Common on fridges made before 2005. Requires a screwdriver to replace.
Type 3 — European Brands
Glued-In Seal
No screws visible, and the seal appears to be tucked or bonded behind the inner door liner. Requires careful removal and re-gluing.
Before You Start
Complete this checklist first
- You have the correct replacement seal for your fridge model
- Warm the new seal in hot water (60°C) for 5–10 minutes to soften it
- Clean the door channel with warm soapy water and dry thoroughly
- Identify your seal type (push-in, screw-in, or glued-in) above
- Fridge is turned off or unplugged if preferred (not required for push-in)
- Allow 2–3 hours before loading food after installation
Tools You'll Need
Most installs need no special tools
Step-by-Step Installation Guides & Videos
Select your seal type below. Each section includes a free video guide and a downloadable PDF instruction sheet.
Push-In Door Seals
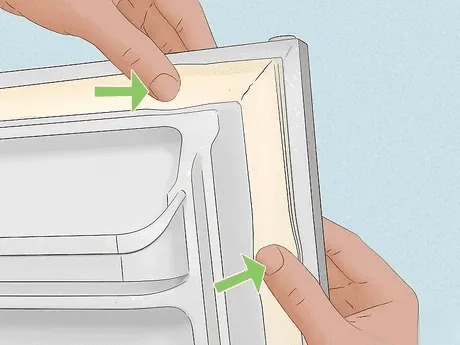
Push-in seals are the most common type fitted to modern fridges. The seal has a dart or spine that pushes directly into a channel around the door frame — no screws needed.
- Warm the new seal in hot water for 5 minutes to make it pliable.
- Starting at a top corner, pull the old seal away from the door channel.
- Line up the new seal at the same top corner and press the dart firmly into the channel.
- Work around the door, pressing in every 10cm as you go.
- Close the door and do the paper test — the seal should grip a sheet of paper.
Pro tip: If corners are lifting, use a hair dryer on low heat to soften the seal at the corners, then press firmly and hold for 30 seconds.
Screw-In Door Seals
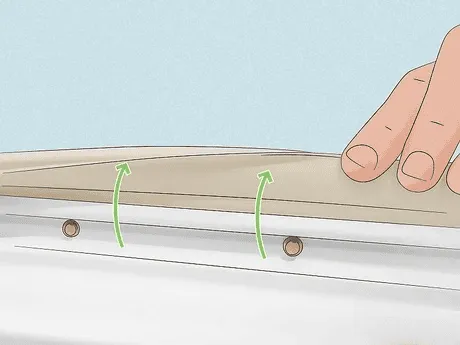
Screw-in seals are held in place by screws under the seal flap around the door liner. Lift the outer lip of the old seal to expose the screws before starting.
- Lift the outer flap of the existing seal to reveal the retaining screws.
- Loosen (but don't remove) the screws around the door — work one side at a time.
- Slide the old seal out from under the screws starting at a top corner.
- Slide the new seal under the loosened screws in the same way.
- Tighten screws firmly once the new seal is fully in position.
- Check alignment and do the paper seal test on all four sides.
Pro tip: Only loosen screws one side at a time — removing all screws makes it difficult to keep the door liner in position.
Glued-In Door Seals

Glued-in seals are bonded behind the door liner. The seal profile is similar to screw-in but retained with adhesive rather than screws. Take care when removing the liner.
- Carefully peel back the door liner to expose the glued seal channel.
- Use a flathead screwdriver (wrapped in tape to protect the liner) to gently release the old seal.
- Clean the channel thoroughly, removing any old adhesive residue.
- Apply a thin line of seal adhesive to the channel.
- Press the new seal firmly into position, starting at a corner.
- Hold each section for 30–60 seconds, then allow 2 hours before use.
Pro tip: Use a hair dryer to warm the liner before removing — this reduces the risk of cracking the plastic.
Fisher & Paykel Seals
Fisher & Paykel use a standard push-in dart seal system. These are among the easiest fridge seals to replace — most customers complete the job in under 10 minutes without any tools.
Note: Ensure you have the correct model number before ordering. Fisher & Paykel seals vary between fridge and freezer compartments on French door and bottom-mount models.
Caravan & RV Fridge Seals
Caravan fridge seals for Dometic and Electrolux models. These are push-in seals but with a slightly different profile to standard domestic fridges — always check your model number when ordering.
Travelling soon? A tight fridge seal is critical in a caravan — warm European conditions can cause food to spoil quickly if the seal is compromised. Check yours before every long trip.
Round Top Vintage Seals (1950s–60s)
Fitting instructions for 1950s and 1960s round top vintage fridges. These rare models require a specialised seal profile. We manufacture custom seals for vintage appliances — contact us with your measurements if your model isn't in our range.
Restoring a vintage fridge? We love working on these! Send us your door measurements and we'll custom-cut a seal to fit. Call us on +45 31786668.
Troubleshooting — Seal Not Working?
If your new seal isn't gripping correctly, or you're seeing condensation or frost build-up after installation, try our troubleshooting videos. Common issues and fixes include:
- Seal corners lifting — warm with a hair dryer and press firmly, or use a small clip for 30 minutes.
- Condensation on the door — door may not be closing fully. Check the fridge is level (use a spirit level) and adjust the feet.
- Frost build-up — indicates a small air leak. Run the paper test around the full perimeter to find the gap.
- Seal feels stiff after installation — normal for new seals. The rubber softens and conforms within 24–48 hours of normal use.
- Still not sealing? — Call us on +45 31786668 and our team will help diagnose the issue.
Frequently Asked Questions
How long does it take to install a fridge seal?
Most installations take between 15-40 minutes depending on the seal type. Push-in seals are the quickest, while glued-in seals take the longest due to drying time.
Do I need to unplug my fridge during installation?
For push-in seals, it's not necessary to unplug the fridge. For screw-in or glued-in seals, it's recommended to unplug the fridge for safety, especially if you're working with electrical components.
How do I test if my new seal is working properly?
Use the paper test: close a sheet of paper in the door so that half is inside and half is outside. Try to pull the paper out — it should offer resistance. If it slides out easily, the seal isn't tight enough.
What if my new seal doesn't fit properly?
First, make sure you have the correct seal for your fridge model. If it's the right seal, warm it in hot water for 10 minutes to make it more pliable, then try installing it again. If problems persist, contact our customer service for assistance.
Ready to Order Your Replacement Seal?
Search by model number, get free video support, and receive fast tracked shipping. Danish made since 2020.